I have used a variety of plants to create dye baths for yarn.
Red and yellow onion skins, black beans, avocado, acorns, red cabbage, lichen, birch bark, red beets, marigolds, dandelions, and green & black tea leaves are just some of the many plant materials out there.
This week I tried out Black Eyed Susans and you won't believe the results!
Black Eyed Susans have beautiful gold/orange petals and deep brown centers. The variety growing in our flower beds is Rudbeckia 'Goldsturm' (German for "gold storm").
According to American Meadows, Goldsturm, developed in Germany, has become one of the most popular and widely planted flowers in America. The plants quickly spread and can take over a large area in no
time, having as many as 20 flowers on each plant.
The areas in front of our dye shed are filled with this stunning flower.
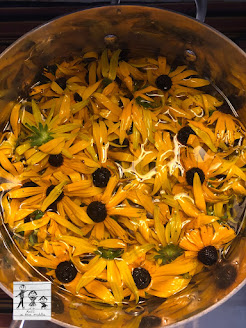
Instead, it was a dull, muddy brown. I even considered pouring the whole thing out, but instead put the lid on and walked away.
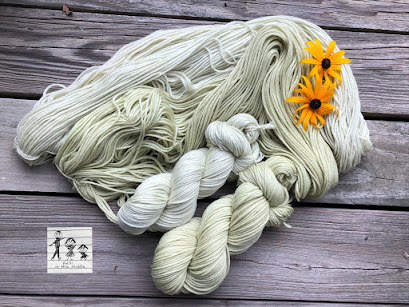
A beautiful Sage Green!
If you would like to try your hand at natural dying using Black Eyed Susans, I have included my recipe below.
Ingredients:
- Approx. 50 Black Eyed Susan flower heads
- Three gallons of room temperature water
- Large Stainless Steel pot with lid
- Strainer - and/or an old T-shirt
- Stainless steel tongs or a large stainless steel spoon to submerge and remove your yarn.
- 2-4 skeins (hanks) of animal fiber yarn, like wool, alpaca, mohair, silk, angora or cashmere or a blend of these fibers and nylon.
- Two teaspoons Cream of Tartar (Alum Powder)
Prepare Dye Bath:
- Pour One Gallon Water into a Stainless Steel Pot (this pot should be a designated dye pot only).
- Add approx. 50 Black Eyed Susan flower heads and stir. You may notice some small bugs and spiders floating on the surface. Please scoop them out and allow them to wander on their way.😉
- Place pot on stove, cover, and turn on medium heat. Let simmer for about an hour, stirring occasionally. Do not allow water to come to a boil as this may spoil your color.
- Turn off the stove and remove from the heat. At this point, your dye may appear muddy brown. (See photo above.)
- Put the lid back on, place the pot out of the way, and allow to steep an additional 24-48 hours.
Prepare Yarn:
- While your dye is steeping, fill a bucket or bin with about one gallon of water.
- Add two teaspoons Cream of Tartar to this water and stir to dissolve.
- Submerge 2-4 skeins of yarn in the water and allow to soak overnight.
- Strain the water from the dye bath into a separate pot or container. Use an old t-shirt to line the strainer to remove all fine particles from your dye bath.
- Your dye water may be a clear, chestnut color by now, or it may be green or redish orange in color. (See above photo.)
- Place the pot with dye bath onto the stove and add enough water to fill to about 3 inches from the rim. This will keep your liquid from spilling over the top once the yarn is added.
- Add 2 tablespoons of white vinegar and stir.
- Tie a long piece of yarn or a plastic zip tie around each skein. This can be draped over the side of your pot, and used to pull out hot yarn.
- Add 2 skeins to the dye bath making sure to fully submerge the fiber. Do not overly agitate your yarn while in the dye bath to keep yarn from felting.
- Cover the pot and slowly bring up heat until water reaches a simmer, approx. 170-200 degrees.
- Let simmer for at least 10 minutes. Do not allow the water to come to a boil.
- Pull out the yarn and if you are not satisfied with the color, submerge back in for 10 more minutes.
- Turn off the heat.
- Remove your yarn and allow it to cool in a plastic bin, bucket or on a ceramic bowl or plate until cool. If you have no more yarn to dye, you may leave your yarn in the pot to cool.
- You may not exhaust all of the dye the first go round and may wish to add another two skeins to a cooled dye bath. Note that the color will lighten with each new batch of yarn added to the dye bath.
- Once your yarn is cool and your dye bath exhausted of most of its color, let the water and the yarn cool completely.
- Pour the bath water onto your garden as it contains plant nutrients.
- Gently rinse your yarn in cool water, add a mild dish soap or wool wash, and then rinse in plain water until clear of all dye.
- Squeeze out the excess water but do not twist or ring the yarn.
- Hang your yarn on a cloths rack or a hook to dry. You can also hang outside to dry, but keep it out of direct sunlight.
- When dry, twist into a hank here or roll into a ball using this technique (or use a yarn winder and swift to create a cake).
 |
| The photo does not do the color justice - it is a beautiful Sage Green! |
Natural dyeing takes some time and effort, but the beautiful results - literally achieved overnight - are so worth it.
Mother Nature continues to surprise and amaze!
Kelli


No comments:
Post a Comment